4. Using Diem plugins
One of symfony's mottoes is "Don't reinvent the wheel". Contact forms and twitter readers are common needs in modern websites. In this chapter we will learn how to use Diem plugins to add such features in our site.
Add a twitter reader in the sidebar
Download
First, we will get and install the latest version of dmWidgetTwitterPlugin. Two methods are available to get a plugin:
Use git
In a command line interface, from your project root dir, run:
git clone git://github.com/ornicar/dmWidgetTwitterPlugin plugins/dmWidgetTwitterPlugin or
Download the package
If you can't (or don't want to) use git, just download a TGZ or ZIP package. You can get them on the plugins page.
Install
With symfony, you must declare explicitly which plugins your application uses in config/ProjectConfiguration.class.php
Add dmWidgetTwitterPlugin to the list of enabled plugins in the call to the ,enablePlugins method. You should get:
# config/ProjectConfiguration.class.php

class ProjectConfiguration extends dmProjectConfiguration
{
  public function setup()
  {
    parent::setup();

    $this->enablePlugins(array(
      'dmWidgetTwitterPlugin'
    ));
Refresh the project
Go to your homepage and click the Refresh button:

This will clear the cache, as you can do with php symfony cc, but also the APC cache if any, and perform some maintenance operations on the project.
Drag&drop the widget
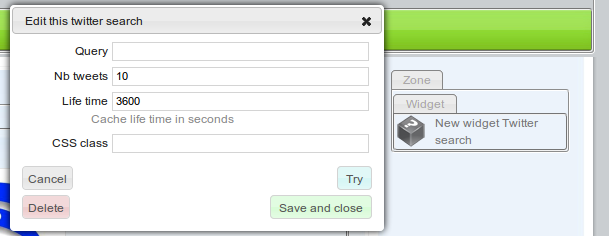
Plugin widgets can be accessed from the front Add menu ![]() . Click on Add, find the twitter/search widget, take it, and drop it in the right Zone. You should see:
. Click on Add, find the twitter/search widget, take it, and drop it in the right Zone. You should see:

This widget allows you to perform a search on twitter, and displays tweets matching a query.
Choose a search query (e.g. "symfony"), a number of tweets you want to display, and for how long in seconds they will be stored locally in cache.
As for any widget, you also can apply CSS classes; but this time we won't need it.
Save the widget.
If you prefer, you can choose to display widgets from one person instead of searching them with a query. To display a twitter user timeline, use the tweeter/timeline widget instead of the twitter/search one.
Learn more about dmWidgetTwitterPlugin.
Add a title for the sidebar
We now have the latest tweets on the right sidebar. That's good, but we should tell our visitor they are the latest tweets.
We need to add a title saying proudly Latest tweets above the twitter reader.
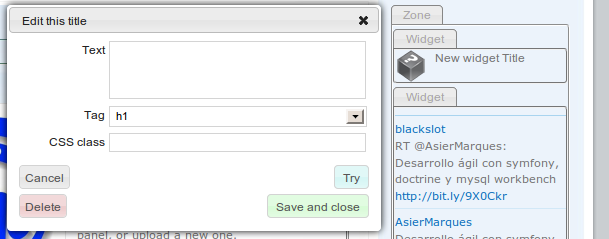
Let's go, open the Add menu, find the content/title widget, take it and drop it on the right Zone, above the twitter widget. As usual, a configuration dialog opens:

In the Text field, write "Latest tweets".
As a tag, choose a p if you think sidebars should not contain headers, or h2 if you think they should.
What matters is that the chosen tag will not interfer with the style. Only the CSS class we set defines how our title looks.
As the CSS class, set "t_side". It's a class defined in typography.css.
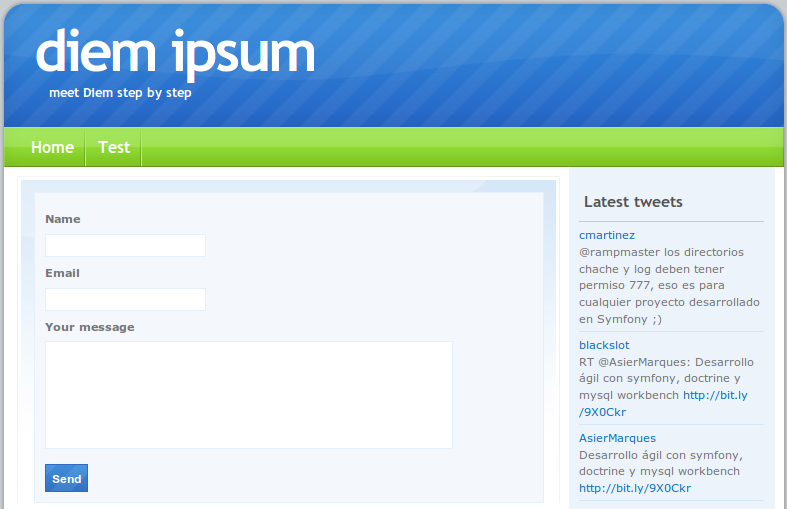
Save the widget, and toggle off editing mode by clicking on the magnifier button of the tool bar. The site now looks like:

Create a contact page
Nearly all customers want a contact page on their site, to get feedback from visitors. This can be done in a quick and simple way with the dmContactPlugin.
Download
Firstly, we will get and install the latest version of dmContactPlugin.
Clone with Git
In a command line interface, from your project root dir, run:
git clone git://github.com/ornicar/dmContactPlugin.git plugins/dmContactPlugin or
Download a package
If you can't (or don't want to) use git, just download a TGZ or ZIP package. See them on the plugin page.
The dmContactPlugin is now installed in the project plugins directory.
Install
Add dmContactPlugin to the list of enabled plugins, in the call to the enablePlugins method. You should have now:
class ProjectConfiguration extends dmProjectConfiguration
{
  public function setup()
  {
    parent::setup();

    $this->enablePlugins(array(
      'dmWidgetTwitterPlugin',
      'dmContactPlugin'
    ));
Both dmWidgetTwitterPlugin and dmContactPlugin are activated.
Migrate the database
Unlike dmWidgetTwitterPlugin, dmContactPlugin plugin uses a database table.
This means you need to add the table to your database and build the model for your project before using it.
Hopefully, symfony and Doctrine automate everything. In a command line, from your project root dir, run:
php symfony doctrine:generate-migrations-diff Migration classes are generated in lib/migration/doctrine
php symfony doctrine:migrate Migrations are applied to the database. The dm_contact table is added.
php symfony dm:setup The models, forms and filters are built.
About these commands
You must run these three commands in this order each time you modify the data model. I.e, each time you modify your config/schema.yml file or install a plugin that modifies the database. Such plugins should remind you to do these steps on their documentation page.
Refresh the project
Go to your homepage and click the Refresh button:

This will clear the cache, as you can do with php symfony cc, but also the APC cache if any, and perform some maintenance operations on the project.
Create the page
The plugin provides a widget to put on a page. So we should first create this page.
Open the "Add" menu on the front tool bar, then click the "Add page" button.
On the new page dialog, set the name to "Contact" and save the page.
You should also add a link to this page on the navigation menu.
Drop the form widget
We will now add the contact form provided by the plugin to the contact page. Open the "Add" menu, find the contact/form widget, take it and drop it in the center Zone. A dialog opens; this widget has only one option, its CSS class.
The form is displayed on the page. It seriously needs some CSS.
Style the form
Plugins can do many things for us, be we still have to write the stylesheets.
Add the form stylesheet to apps/front/config/view.yml:
  stylesheets:
    - layout
    - typography
    - navigation
    - markdown
    - form
Then download the form.css file to web/themeCoolWater/css/form.css.
The contact page now looks like that:

Add a H1 title to the contact page
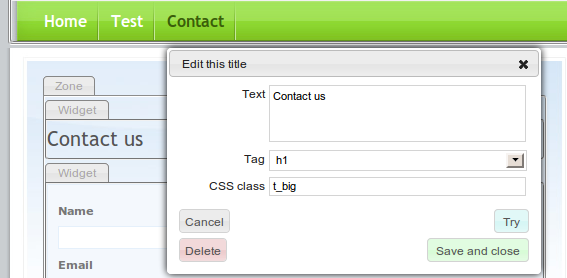
Each page should have a H1. Drag and drop a content/title widget from the "Add" menu to the center Zone, just above the contact form. Set the title text to "Contact us" and apply the "t_big" class.

Try the form
Try submitting the form. Note that each field is required, and the email field only accepts valid emails.
Send at least one valid request, so you can see it the admin interface.
Manage contact requests in admin
Go to the admin application with the admin button on the front tool bar:

On the admin tool bar, a new Content menu appeared; it contains a link to the stored contact requests:

On this classical backend CRUD interface, you can manage efficiently the contact requests.

Learn more about dmContactPlugin.
Want more?
See the current list of Diem plugins.
That's all for this chapter. On the next one, serious things will begin. We will create our own specific blog engine, without relying on any plugin.
See the current source code on Github: Diem Ipsum 5.1 Page 4
Questions and Feedback
If you need support or have a technical question, you can
- Get help with the Google Group
- Get help with the Forum
- Come and chat on the #diem IRC channel on freenode
The documentation is hosted on GitHub. Feel free to submit issues and patches!
