2. Your first project with Diem
So, what kind of project are we making?
The Diem Ipsum project's ultimate goal is to help you, the users. That's why we won't actually set a clear goal for now, but instead we will look forward to requests for features and modules from the community and show you how to build them with Diem. This means that the project we are building has to be flexible and have the ability to evolve in new, unpredictable ways.
You know, just as is the case with most professional applications in the real life ;)
Installation
Diem Versions
There are two ways of installing Diem - from the official package or through Git. Let us briefly discuss the differences:
If you are using the official package, you will notice that it comes with the latest stable version of symfony already included. That is because, as you already know, Diem depends on symfony. In contrast, the Git will hold the latest Diem improvements (which may be unstable) and will contain an externals entry to the symfony trunk (again, which may be unstable). Which version you use is entirely for you to choose, however we would recommend sticking to the official package when working with production servers.
Creating the Project Directory
Now that you have selected your version of Diem, let's create a directory to hold all the files:
mkdir -p /home/diemprojects/diem-ipsum
cd /home/diemprojects/diem-ipsum
Installing Diem
The Diem lib files can be placed anywhere you like, so that you can have a single instance of the Diem installation used by many projects, or have Diem embedded into each separate project. We are going to show you how to do the latter, installing Diem in lib/vendor/diem:
mkdir -p lib/vendor
cd lib/vendor
You now need to download the latest version of Diem into your new vendor directory. There are several ways to do this, all described on the Downloads page in the docs, but here are two options for this tutorial.
Use Git
The first option is to use git to clone the full source
git clone git://github.com/diem-project/diem.git --recursive
cd diem
git submodule init
git submodule update
cd /home/diemprojects/diem-ipsum
Download a package
If you can't (or don't want to) use git, you can use curl to download the full package as a single file then uncompress it
curl http://github.com/downloads/diem-project/diem/diem-5.0.5.tgz
tar zxpf diem-5.0.5.tgz
mv diem-5.0.5 diem
rm diem-5.0.5.tgz
cd /home/diemprojects/diem-ipsum
That's the end of options for the moment. You should be in the root of your new project directory (/home/diemprojects/diem-ipsum in our example)
Now we will run the Diem installer. It will automatically perform a requirements check and inform you of any potential problems, after which it will guide you through the initial Diem setup.
php lib/vendor/diem/install For the more curious of you, what this command does is initiate symfony's project:generate task with Diem's custom installer script.
Installation Notes
Windows users will be prompted to run php symfony dm:setup after the initial installation has completed; This is due to limitations of the Windows platform.
Follow these links and learn more about the Installation and Requirements.
Almost finished...
Before we dive into Diem layouts, download the following sample images into the diem-ipsum/web/uploads directory
Congratulations, Diem is now installed!
It was easy, wasn't it? With just those few simple steps you have a running Diem installation! Two applications have been created, a publicly accessible front and a secured back-end admin (you can log in now with the password from the installation at admin_dev.php and look around).
Building layouts with Diem
We are now going to learn how to build layouts with Diem's front JavaScript console, but before we do that we need to have a design. The coolwater style from styleshout is free and suits our needs perfectly.
Set up the theme
Diem allows you to easily set up themes for your applications. Let's do that now for the CoolWater theme. First download the theme archive and extract it to web/themeCoolWater. Then open the apps/front/config/dm/config.yml file and set the contents as follows:
# apps/front/config/dm/config.yml
all:

  theming:                          # the theming component
    themes:                         # list of themes
      coolwater:                    # theme key
        name:      Cool Water       # theme name; defaults to the theme key
        dir:       themeCoolWater   # the directory in the web dir that holds the theme files
        enabled:   true             # whether the theme is enabled for use with the dmThemeManager

  html:
    doctype:
      name:               html                    # Doctype name ( 'html', 'xhtml' )
      version:            5                       # Doctype xhtml version ( '1.0', '1.1' ) or html version ( '4', '5' )
      compliance:         transitional            # Doctype xhtml compliance ( 'strict', 'transitional' )
Include the stylesheets
Once you have created a theme, you need to include its stylesheets through symfony's view configuration. Head over to the apps/front/config/view.yml config file and paste the following code:
# apps/front/config/view.yml
default:

  http_metas:
    content-type: text/html

  stylesheets:
    - layout
    - typography

  javascripts:     # we don't need any JS right now

  has_layout:      true
  layout:          layout
Since we have implemented a theme for our site, Diem will look for the stylesheets layout and typography in the web/themeCoolWater directory.
Layout setup
When developing with Diem, you do not need to deal with layout.php - the generation of clean and semantically sound x/html is handled internally. What you will be working with is Diem's own layouting system, which consists of two components: page layouts and widgets.
When you create your project, Diem will automatically create this layout for your pages:
<!-- apps/front/modules/dmFront/templates/pageSuccess.php -->

<div id="dm_page"<?php $isEditMode && print ' class="edit"' ?>>

  <div class="dm_layout">

    <?php echo $helper->renderArea('layout.top', '.clearfix') ?>

    <div class="dm_layout_center clearfix">

      <?php echo $helper->renderArea('layout.left') ?>

      <?php echo $helper->renderArea('page.content') ?>

      <?php echo $helper->renderArea('layout.right') ?>

    </div>

    <?php echo $helper->renderArea('layout.bottom', '.clearfix') ?>

  </div>

</div>
The default Diem pageSuccess.php layout is split into five Areas:
layout.top, layout.left, content, layout.right and layout.bottom.
The purpose of Areas is to contain widgets.
Areas prefixed with "layout." can be reused by several pages; Areas prefixed with "page." are specific to the page.
Each widget is actually a simple symfony component rendered through a partial.
You set up these widgets through an intuitive visual interface, but more on that later.
Diem comes bundled with the most often used widgets and you can easily extend it with your own.
To learn more about this read the Diem layout documentation.
We have no need for the left area for this site, so let's remove it:
<!-- apps/front/modules/dmFront/templates/pageSuccess.php -->

<div id="dm_page"<?php $isEditMode && print ' class="edit"' ?>>

  <div class="dm_layout">

    <?php echo $helper->renderArea('layout.top', '.clearfix') ?>

    <div class="dm_layout_center clearfix">

      <?php echo $helper->renderArea('page.content') ?>

      <?php echo $helper->renderArea('layout.right') ?>

    </div>

    <?php echo $helper->renderArea('layout.bottom', '.clearfix') ?>

  </div>

</div>
Using Diem widgets
As we said before, Diem widgets are basically symfony components with partials. The difference with symfony is that in Diem you can drag&drop these widgets directly onto the page (inside layout Areas) using the user interface of Diem, instead of including them programatically. This helps streamline the process and has the added benefit of seeing the results in real time.
Invoking the layout interface
To get to the front application layout building interface, first log in to the admin panel at localhost/admin.php and then click on the "Go to site" link in the tool bar.
First, a quick word about the zone widget. This widget represents a simple separator (a div to be specific). Just use it as you would use a normal div tag. Also, a zone is automatically created for every Area defined in a layout, so don't be surprised when you open the supposedly empty project and there are zones are already included ;-)
By default, new projects contain a main/header widget. This means the partial is located on the main module, and it's filename is _header.php. Let's add this widget to the page. Invoke the layout interface and click on the "Add" button in the toolbar at the bottom of the page:
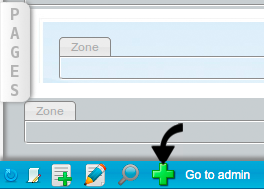
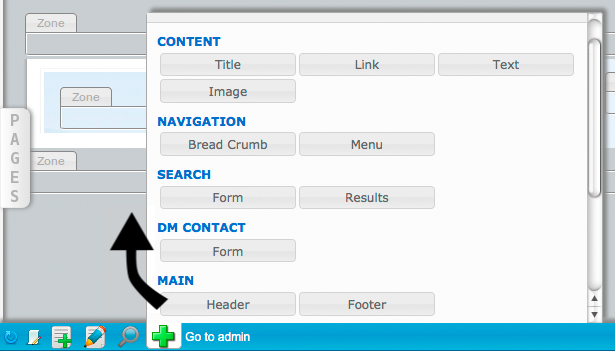
The "Add" menu contains a list of all widgets you can append to the page. Find the main/header widget and drag it around. Then drop it on the top Zone.
Drag the header widget:
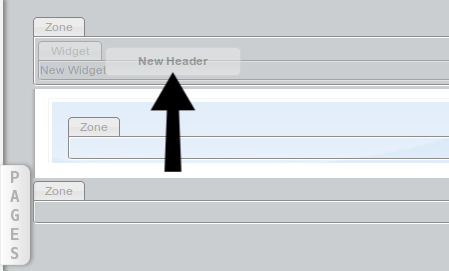
Now drop it on the top zone. This will open a window in which you can customize the widget. For now, leave it blank and click the "Save and close" button.
Similarly, drag&drop the main/footer widget to the bottom zone.
The result:
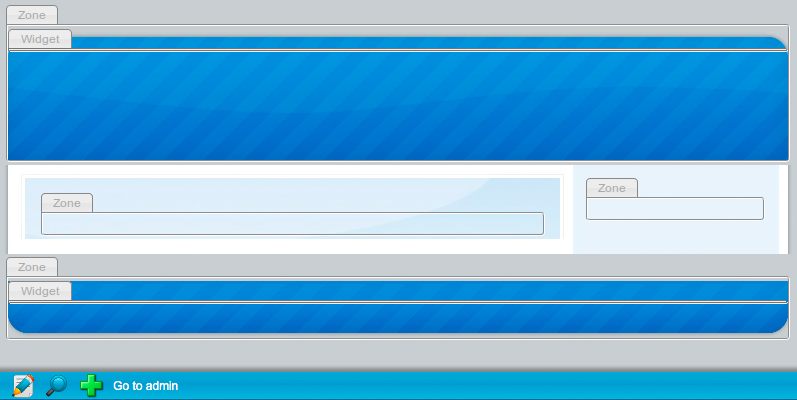
To toggle OFF the editing mode and see what this looks like for the end user, click the magnifier button on the lower tool bar:

Writing the site name in the header widget
What good is a website without a big and nice title?
Open the header partial in
apps/front/modules/main/templates/_header.php
And append the following code inside:
echo _tag('h1.t_site', _link('@homepage')->text('diem ipsum'));

echo _tag('p.t_baseline', __('meet Diem step by step'));
This code uses Diem template helpers. The _tag() function writes a x/html element. Its first argument's syntax is exactly like a CSS or jQuery selector, allowing you to set the tag/class/id all at once. The second argument is the content of the element. You will see this function used a lot throughout the Diem Ipsum project.
In this example
echo _tag('h1.t_site', _link('@homepage')->text('diem ipsum'));
will output
<h1 class="t_site"><a class="link" href="/">diem ipsum</a></h1>
Helpers
Diem template helpers expand upon the symfony approach.
They make templates cleaner and more concise by removing the need to open and close several PHP tags. By using the CSS and jQuery syntax, they standardize HTML manipulation. And they will always output XHTML Strict compliant code.
Their usage is recommended, but not required.See the complete Diem template helpers documentation to learn more.
You should now see:

Things are starting to get shape. Now let's add the code for the footer:
<!-- apps/font/modules/main/templates/_footer.php -->

<p>
  diem ipsum | Diem Project | website template by <a href="http://www.styleshout.com/">styleshout</a>
</p>
Yes, we are using plain HTML because for now the footer doesn't need dynamic content. When you first open the template it will have an opening php tag - don't forget to remove it.
The result of today's work
We have learned how to set up Diem and are well on the way to building our first Diem project. We now have a grasp of Diem themes, templates, widgets and helpers. Tomorrow we will tackle page creation with Diem, but for now let's take a step back and look at what we have accomplished:

See the current source code on Github: Diem Ipsum 5.1 Page 2
Questions and Feedback
If you need support or have a technical question, you can
- Get help with the Google Group
- Get help with the Forum
- Come and chat on the #diem IRC channel on freenode
The documentation is hosted on GitHub. Feel free to submit issues and patches!
