Widgets
Widgets are independant pieces of HTML. Together, they make a page.
Built-in widgets
Diem comes with a set of built-in widgets. They allow to generate valid HTML and require no technical knowledge.
To add a widget on a page, click the "Add" button on the front application lower tool bar.
Content
These widgets add content on the page.
Title
Add a title on the page.
- Text the text to display in the title tag.
- Tag select a title tag between H1, H2, H3, H4, H5, H6, P and DIV.
- Href if you set a href, a link will be inserted into the title
- CSS class add a CSS class to the widget.
Link
Add a link on the page.
- Href link's target.
- To one of your site's pages: open the PAGES left panel and drag & drop a page to the field. This way, if the page's url change later, your link href will be changed accordingly.
- To one of your site's medias: open the MEDIA right panel and drag & drop a media to the field.
- To an external resource: write a full url in the field.
- Text the text to display in the link tag. If let empty, the targeted page's name will be used.
- Title the link title attribute. If left empty, the targeted page's title will be used.
- CSS class add a CSS class to the widget.
Text
Add a text on the page. A text may be composed with a title, a body and a media.
- Title if set, the title will be displayed in a H2
- Body the body uses markdown syntax. Body's title hierarchy start with H3.
-
Media
-
File
- Use an existing media : open the MEDIA right panel and drag & drop a media to the field.
- Upload a new media
- Alt the media alt attribute. Useful for image medias.
- Dimensions the width and height of the media. If one of them is omitted, it will be calculated based on the original media size.
- method method used when creating the thumbnail. Can be fit, center, scale or inflate. The default method can be changed in the admin configuration panel
- JPG quality quality of the resized thumbnail. Only works with JPG images.
-
File
-
Links
-
Title add a link to the text title.
- To one of your site's pages: open the PAGES left panel and drag & drop a page to the field. This way, if the page's url change later, your link href will be changed accordingly.
- To one of your site's medias: open the MEDIA right panel and drag & drop a media to the field.
- To an external resource: write a full url in the field.
-
Media add a link to the text media.
- To one of your site's pages: open the PAGES left panel and drag & drop a page to the field. This way, if the page's url change later, your link href will be changed accordingly.
- To one of your site's medias: open the MEDIA right panel and drag & drop a media to the field.
- To an external resource: write a full url in the field.
-
Title add a link to the text title.
-
Presentation
- Css class add a CSS class to the widget.
- Title position whether the text title should be inside or outside the text content.
Image
Add an image on the page.
-
File
- Use an existing media : open the MEDIA right panel and drag & drop a media to the field.
- Upload a new media
- Alt the media alt attribute. Useful for image medias.
- Dimensions the width and height of the media. If one of them is omitted, it will be calculated based on the original media size.
- Method method used when creating the thumbnail. Can be fit, center, scale or inflate. The default method can be changed in the admin configuration panel
- JPG quality quality of the resized thumbnail. Only works with JPG images.
- Css class add a CSS class to the widget.
Navigation
These widgets add navigation elements on the page.
Bread crumb
Add an automatic breadcrumb on the page.
- Separator string to insert between two links/
- Include current page if checked, the current page is added at the end of the bread crumb.
- Css class add a CSS class to the widget.
Menu
Allow to create and manage a menu by dropping pages from the PAGES panel.
-
Items In this blank space, you can drag&drop pages from the left PAGES panel. It creates menu items.
- Drag items to sort them
- Click items to modify their text, link and depth.

Recursive menus: set a depth to an item. It's descendants are added to the menu.
- UL class add a CSS class to the menu UL tag.
- LI class add a CSS class to all menu LI tags.
- Css class add a CSS class to the widget.
Advanced
Advanced widgets to enhance the site.
Search form
Add an internal search engine form to allow users to performs searches on the site.
- Css class add a CSS class to the widget.
Customize the search form template
Copy dmFrontPlugin/modules/dmWidget/templates/_dmWidgetAdvancedSearchForm.php
to apps/front/modules/dmWidget/templates/_dmWidgetAdvancedSearchForm.php
then modify it to match your needs.
Search results
Displays the search results for the current search. Should be added on the main/search page.
- Css class add a CSS class to the widget.
Customize the search results template
Copy dmFrontPlugin/modules/dmWidget/templates/_dmWidgetAdvancedSearchResults.php
to apps/front/modules/dmWidget/templates/_dmWidgetAdvancedSearchResults.php
then modify it to match your needs.
Create project-specific widgets
It's as simple as adding a component in the config/dm/modules.yml file.
In this example, we will create a simple widget that says hello.
config/dm/modules.yml:
Content:

  Global:

    main:

      components:

        hello:        # declare a new component for the main module
Then go back to the front application and click the "Clear cache" button. It will generate the main/hello component and template in apps/front/modules/main.
If the files are not created, see the Troubleshooting.
Now we can click the front lower tool bar "Add" button, and drag & drop the new main/hello widget somewhere on the page.
Of course, it does nothing yet.
To write the controller, edit the file
apps/front/modules/main/actions/components.class.php:
class mainComponents extends myFrontModuleComponents
{
  public function executeHello()
  {
    $this->name = $this->getRequest()->getParameter('name', 'anonymous');
  }
}
Then we will create the template, in
apps/front/modules/main/templates/_hello.php
echo 'Hello '.escape($name);
Now call your page with a name get parameter like "/mypage?name=jack".
For more info on specific widget creation, see the config/dm/modules.yml documentation.
Render widgets programmatically
All widgets can be placed on the page with a drag&drop from the Add menu; but you also can include them programmatically from a template. Such widgets will not be created in the database, and can not be modified from the front edition interface.
The basic syntax is
echo dm_get_widget($module, $action, $params);
Project widgets
For example, we will include your main/header widget, give it a CSS class and pass a param1 parameter to the component.
echo dm_get_widget('main', 'header', array(
  'css_class' => 'my_custom_class'
  'param1'    => 'value1'          //pass a parameter to the main/header component
));
Next example is to include your foo/show widget, and to pass a recordId parameter to the component.
echo dm_get_widget('foo', 'show', array(
  'recordId' => $id  //pass a recordId to the foo/show component
));
Your list widgets have 2 required parameters, to configure the query.
// include a list widget
echo dm_get_widget('article', 'list', array(
  'orderField'  => 'title', //required
  'orderType'   => 'asc',   //required
  'maxPerPage'  => 10       //optional
  'navTop'      => true     //optional
  'navBottom'   => false    //optional
));
Built-in widgets
For example, we will include the Diem search form widget and give it a CSS class.
echo dm_get_widget('dmWidgetSearch', 'form', array(
  'css_class' => 'my_custom_class'
));
Some widgets require parameters, like the bread crumb widget.
echo dm_get_widget('dmWidgetNavigation', 'breadCrumb', array(
  'separator'      => '>',
  'includeCurrent' => true
));
To know the required parameters of this built-in widget, see the dmWidgetNavigationBreadCrumbView class.
Customize built-in widgets
In this advanced section, we will learn how to customize built-in widgets.
As an example, let's suppose we want to modify the menu widget in order to give it an HTML ID.
We need to modify the menu widget form, to have an ID field.
We need to modify the menu widget view, to wrap the menu HTML into a div that has the specified ID.
Change builtin widgets classes
You can replace every widget form and view classes in
config/dm/widget_types.yml
dmWidgetNavigation:

  menu:
    form_class:         myWidgetMenuForm
    view_class:         myWidgetMenuView
This tells Diem to use myWidgetMenuForm as the menu form class, and myWidgetMenuView as the menu view class. See the whole list of overridable widget classes in dmCorePlugin/config/dm/widget_types.yml.
Override the form class
Create your menu widget form class:
lib/myWidgetMenuForm.php
class myWidgetMenuForm extends dmWidgetNavigationMenuForm
{
  public function configure()
  {
    parent::configure();

    $this->widgetSchema['wrapperId']      = new sfWidgetFormInputText(array(
      'label' => 'Wrapper ID'
    ));
    $this->validatorSchema['wrapperId']   = new sfValidatorString(array('required' => false));
  }
}
Nothing special here, it's just about extending a symfony form to add a field.
Override the form template
Some widget forms are quite complex and need a template to be displayed. This is the case with the menu widget form. So we need to copy the template from
dmFrontPlugin/modules/dmWidget/templates/forms/dmWidgetNavigationMenu.php
to
apps/front/modules/dmWidget/templates/forms/dmWidgetNavigationMenu.php.
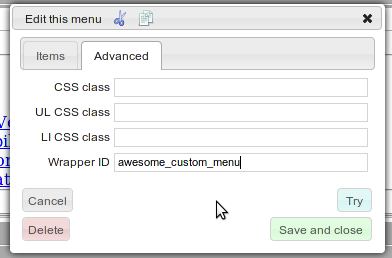
Then add the wrapperId field somewhere, for example at the end of the template, in the Advanced tab:
// ... template code
_tag('div#'.$baseTabId.'_advanced',
  _tag('ul.dm_form_elements',
    $form['cssClass']->renderRow().
    $form['ulClass']->renderRow().
    $form['liClass']->renderRow().
    $form['wrapperId']->renderRow()
  )
),

_close('div'); //div.dm_tabbed_form
Change the form template
You can tell the form to use a different template by overriding the "renderContent" method of your myWidgetMenuForm class
class myWidgetMenuForm extends dmWidgetNavigationMenuForm
{
  protected function renderContent($attributes)
  {
    return $this->getHelper()->renderPartial('dmWidget', 'forms/myWidgetNavigationMenu', array(
      'form' => $this,
      'items' => $this->getValueOrDefault('items'),
      'baseTabId' => 'dm_widget_menu_'.$this->dmWidget->get('id')
    ));
  }
Override the view class
Create your menu widget view class:
lib/myWidgetMenuView.php
class myWidgetMenuView extends dmWidgetNavigationMenuView
{
  protected function doRender()
  {
    // use cache if available
    if ($this->isCachable() && $cache = $this->getCache())
    {
      return $cache;
    }

    // get the view vars processed from the form
    $vars = $this->getViewVars();

    if(isset($vars['wrapperId']))
    {
      $html = $this->getHelper()->tag('div#'.$vars['wrapperId'], $vars['menu']->render());
    }
    else
    {
      $html = $vars['menu']->render();
    }

    // cache the HTML
    if ($this->isCachable())
    {
      $this->setCache($html);
    }

    return $html;
  }
}
By overriding the doRender() method, you can change the way the menu is rendered. Here, we wrap the menu with a div if the wrapperId var exists.
Use it
Apply all these changes by clicking the refresh button on the front tool bar, then enjoy your custom widget:
By using config/dm/widget_types.yml you can also create new built-in widgets with complex forms and views.
Please share them by packaging them in a plugin!
Questions and Feedback
If you need support or have a technical question, you can
- Get help with the Google Group
- Get help with the Forum
- Come and chat on the #diem IRC channel on freenode
The documentation is hosted on GitHub. Feel free to submit issues and patches!