5. Build a blog engine
Real development begins here
In this chapter we will start real development and create our own blog engine from the ground up.
Define the data model
Open config/doctrine/schema.yml and declare the Article model:
Article:
  actAs:
    DmSortable:
    I18n:
      fields:         [ title, extract, body, is_active ]
      actAs:
        Timestampable:
        DmVersionable:
  columns:
    title:            { type: string(120), notnull: true }
    extract:          { type: string(2000), notnull: true }
    body:             { type: clob, extra: markdown }
    image:            { type: integer }
    author:           { type: integer, notnull: true }
    is_active:        { type: boolean, notnull: true, default: false }
  relations:
    Image:
      class:          DmMedia
      local:          image
      foreignAlias:   Articles
    Author:
      class: DmUser
      local: author
      foreignAlias:   Articles
Let's explain a bit what we declared.
The Article model:
actAs:
Timestampable:
Each article has a created_at column and an updated_at column. These columns store the date when the article was created and updated.
DmSortable
On the admin application, we will have an interface to sort the articles. We can choose which of them appears in first position, then the second, etc. The order we choose will be applied on the front application. See DmSortable documentation.
I18n
The fields [ title, extract, body ] are translatable. We can assign them a different value depending on the language.
DmVersionable
The articles are versionned. Every version of an article is versionned, we can see old versions, visualize differences between two versions and restore an old version. See DmVersionable documentation.
columns
title
Each article has a title of no more than 120 characters. The title can not be empty.
extract
Each article has an extract that resumes its content. It cannot exceed 2000 characters and cannot be empty.
body
Each article has a body. It's number of characters is virtually unlimited and it is written in markdown.
image
The article image is a local key to a DmMedia. It can be empty.
author
The article author is a local key to a DmUser. It cannot be empty.
is_active
The article can be active or inactive. An active article will appear on the front application. By default, an article is not active.
relations
Image
Each article owns an Image. An Image is an instance of DmMedia and the article local key is image.
Author
Each article owns an Author. An Author is an instance of DmUser and the article local key is author.
Learn more about Doctrine schema.yml.
Update the project
As we modified the schema.yml, the first thing to do is... migrate the database.
In command line, from your project root dir, run:
php symfony doctrine:generate-migrations-diff

php symfony doctrine:migrate

php symfony dm:setup
Now we have an Article model in lib/model/doctrine/Article.class.php, an ArticleForm form in lib/form/doctrine/ArticleForm.class.php and an article table in the database.
Create an admin interface
Symfony provides an excellent admin generator. It only requires you to write a configuration file named generator.yml...
Diem goes farther by writing it for you, using table introspection.
In order to make Diem generate the article admin module, you first have to tell it the article module exists.
Declare the article module
Open config/dm/modules.yml and define the Blog namespace, containing the article module:
Content:

  Global:

    main:
      components:
        header:
        footer:

  Blog:

    article:
Generate admin interface
Now Diem is aware about the article module. We will ask it to generate an admin interface for it.
In a command line, from the project root dir, run:
php symfony dm:setup Look into apps/admin/modules/article, an admin module has been generated.
Troubleshouting
If the module was not generated, it may be due to insufficient file permissions. To make sure Diem can write these files, grant more permissions on your apps directory. In a command line, from your project root dir, runchmod -R 777 appsThen click the refresh button again.
Play with articles
Open article admin module
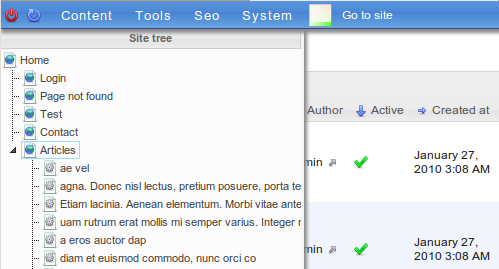
In your browser, go to the admin application and open the Content menu: it now contains the Blog namespace we declared, with its article module.

Click on Articles. There is no article yet.
Generate records
With symfony, you should write fixtures to generate dummy articles. I personally hate writing fixtures.
Diem will do that for us. Look under the empty article list, there is a "Loremize" box.
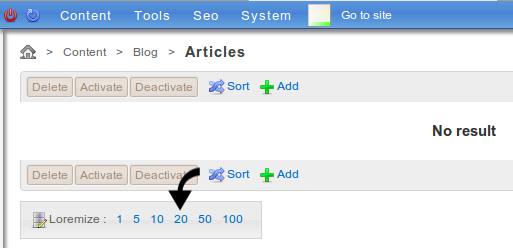
Click on 20 to generate 20 random articles. Done.
Feel free to explore and play with the article admin module.
As a symfony generated module, it is configured by the file located on apps/admin/modules/article/config/generator.yml
Learn more about symfony generator.yml.
Link pages to articles
We want Diem to create one page for each article.
Diem pages
Unlike symfony, in Diem each page is a record in the database and an instance of DmPage.
Open config/dm/modules.yml and add the "page" option to the article module.
Content:

  Global:

    main:
      components:
        header:
        footer:

  Blog:

    article:
      page:         true
Diem knows that the article record has a dedicated page on the front application. Each time an article is added, a page is created. The page will be removed if the article is deleted.
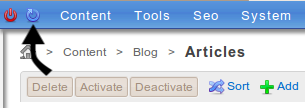
To apply the change, click on the refresh button of the toolbar:
Now, open the left page panel. You should see the article pages.
Add the blog link to the front menu
Go to the front application, toggle editing mode to ON and open the menu Widget dialog. From the pages panel, drag and drop the Articles page to the dialog. Then, on the dialog, click "Articles" to change its name to "Blog".

You should also place the Blog menu item item just after Home. Save the widget, the menu now looks like:

The blog page
Go to your blog. The page is empty.
Add a H1
As usual, we should start by adding a H1 tag. Drop a title widget on the content, give it a name and a "t_big" class.
Add the article list
Now, we need a list of the blog articles here. We need a component to fetch the records from the model and a partial to display them.
Instead of creating them manually, we will let Diem do it for us.
Declare the article/list component
In the modules.yml config file, add the list component to the article module:
config/dm/modules/yml
  Blog:

    article:
      page:         true
      components:
        list:
Refresh the project to generate the code
Go back to the front and click the refresh icon. Some code is generated:
apps/front/modules/article/actions/components.class.php
class articleComponents extends myFrontModuleComponents
{
  public function executeList()
  {
    $query = $this->getListQuery();

    $this->articlePager = $this->getPager($query);
  }
}
This thin component builds a doctrine query that matches all active posts, then creates a pager with it. The pager is passed to the partial.
apps/front/modules/article/templates/_list.php
echo $articlePager->renderNavigationTop();    // render pager links (< 1 2 3 >) if needed

echo _open('ul.elements');                    // open a UL tag with the "elements" class

foreach ($articlePager as $article)           // iterate on the pager
{
  echo _open('li.element');                   // open a LI tag with the "element" class

    echo _link($article);                     // render a link to the article

  echo _close('li');                          // close the LI
}

echo _close('ul');                            // close the UL

echo $articlePager->renderNavigationBottom(); // render pager links
Troubleshooting
If the previous code was not generated, it may be due to insufficient file permissions. To make sure Diem can write these files, grant more permissions on your apps directory. In a command line, from your project root dir, runchmod -R 777 appsThen click the refresh button again.
Everything seems ok, let's see if it works.
Drop the article/list widget
Go back to the front and find the new article/list widget on the "Add" menu. Take it and drop it in the page, just below the H1. A dialog opens which allows us to configure the article list:

Order by
We can choose by which column the articles will be sorted, as well as the order type: ASC, DESC or RAND.
For the blog, it makes sense to order the articles by position. This means we can sort them from the admin article module to modify their order in this list.
Per page
The maximum number of articles displayed on a page. You can choose to display pagination links on the top and/or the bottom of the list.
Choose 3 elements per page and check top and bottom.
CSS class
As for all widgets, you can specify some CSS classes. We don't need to use this field each time, because Diem already applies CSS classes based on the module and action of the widget. This article/list widget automatically gets the "article_list" css class.
Save the widget, we now have a paginated list of articles: victory! Well, we probably could make it better by adding some style and modifying the _list.php partial.
Add the article stylesheet
Open the apps/front/config/view.yml config file and append "article" to the list of loaded stylesheets.
  stylesheets:
    - layout
    - typo
    - navigation
    - markdown
    - form
    - article
Then download this article.css file to web/themeCoolWater/css/article.css.
Customize the _list.php partial
Seeing the article title in the list is not enough. We want a real article list like in the coolwater template. So we will customize the article/list partial and add what's missing.
apps/front/modules/article/templates/_list.php
use_helper('Date');

echo $articlePager->renderNavigationTop();

echo _open('ul.elements');

foreach ($articlePager as $article)
{
  echo _open('li.element');

    // wrap the article link into a H2 tag with the t_medium CSS class
    echo _tag('h2.t_medium', _link($article));

    // show the article extract, processed with markdown
    echo markdown($article->extract, '.extract');

    // in a P tag, we put some infos about the article
    echo _tag('p.article_infos',

      // creation date of the article, formatted with a symfony helper
      _tag('span', format_date($article->createdAt, 'D')).
      ' | '.
      // article author
      _tag('span', $article->Author).
      ' | '.
      // another link to the article, with the "Read more" translated text
      _link($article)->text(__('Read more...'))
    );

  echo _close('li');
}

echo _close('ul');

echo $articlePager->renderNavigationBottom();
Save this customized template and check the result.

The article page
Click on one of these articles to reach the article page. No surprise, the page is empty.
To render an article, we need another component method, with another template.
Declare the article/show component
Open the modules.yml file and declare the article show component.
config/dm/modules.yml
  Blog:

    article:
      page:         true
      components:
        list:
        show:
Refresh the project to generate the code
... by clicking the refresh button on the front tool bar.
A executeShow method has been added to
apps/front/modules/article/actions/components.class.php
public function executeShow()
{
  $query = $this->getShowQuery();

  $this->article = $this->getRecord($query);
}
A query is built that finds the article. Then the article is fetched from the query and passed to the template.
apps/front/modules/article/templates/_show.php
echo $article;
Drop the article/show widget
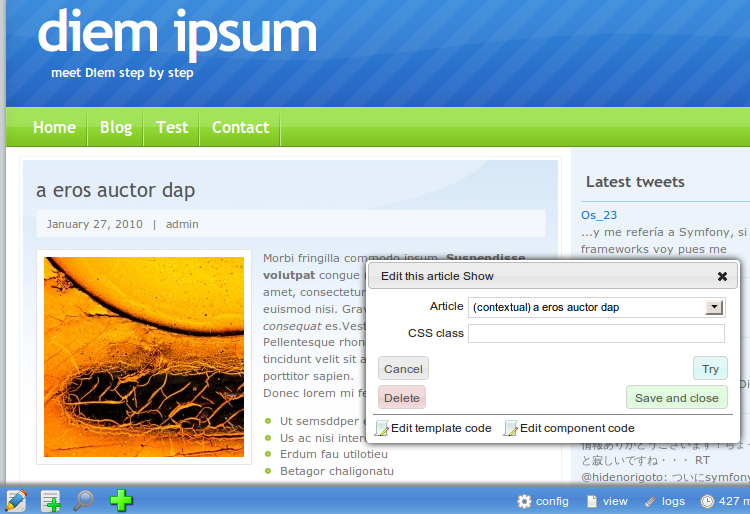
On the article page, find the article/show widget on the "Add" menu. Take it and drop it to the page. A dialog opens.

The dialog asks which article we want to show on this page. If we leave set to "(contextual)", the widget will automatically show the current article for the current page. This means on each article page, the correct article will be selected automatically. This is what we want, so leave it to contextual.
We don't need to add any special CSS class. The article.css stylesheet uses the automatically generated "article_show" CSS class.
Save the widget. We clearly need to customize the _show.php partial.
Customize the _show.php partial
Let's print the article title in a H1, some info about it, it's image and it's body processed with markdown.
use_helper('Date');

echo _open('div.clearfix');

// Wrap the title in a H1
echo _tag('h1.t_big', $article->title);

// Open a P tag to display some article infos
echo _tag('p.article_infos',

  _tag('span', format_date($article->createdAt, 'D')).
  ' | '.
  _tag('span', $article->Author)
);

// render the article image.
// scale it to 200px width and height.
// give it the "image" CSS class.
echo _media($article->Image)->size(200, 200)->set('.image');

// render article body processed with markdown.
echo markdown($article->body);

echo _close('div');
This template uses the _media helper. This powerful tool allows us to manipulate and resize images when we need it, in the template. The processed image is saved on disk for later access. Learn more about the _media template helper.
Here is the result of our efforts.
If you see no image or no text, try with another article. During "loremization", some of them are created with an empty image or body, as our schema.yml authorities it.
We now have our basic blog engine. In the next chapter we will improve it:
- add breadcrumbs
- power up the article pager with Ajax
- provide RSS feeds
- show the latest articles in the sidebar
- add a powerful search engine
See the current source code on Github: Diem Ipsum 5.0 Page 5
Questions and Feedback
If you need support or have a technical question, you can
- Get help with the Google Group
- Get help with the Forum
- Come and chat on the #diem IRC channel on freenode
The documentation is hosted on GitHub. Feel free to submit issues and patches!